Are you scratching your head while finding the solutions to how to remove toilet seat with hidden fixings and bolts? Or just planning to spend money by asking a handyman to replace the toilet seat? Moreover, is the limited space of the toilet seat giving major drawback to your cleaning and needs to be removed?
Well, there are many reasons to remove the toilet seat. However, the major reasons include the lack of cleaning or maybe replacement of the seats.
In addition to it, some of the seats are easy to remove but, there are some toilet seats with hidden bolts that require some extra effort to remove. Lets’ dive into the solution for the problem:
Contents
How to Remove Toilet Seat with Hidden Fixings And Bolts?

All toilet seats fall into certain categories. Either D-shaped, rounded or elongated. But, there is nothing to do with the categories and removing the seats. All of these seats come with a hidden attachment called hinges.
These hinges can sometimes be covered with a protective layer to help protect them from water and rust.
However, removing the toilet seat with hidden bolts may require some tools. These tools are listed below:
Tools Required for the Removal of Toilet Seat
- Protective or rubber gloves
- Duct tape
- Screwdriver with flat and star head
- Penetrating oil (to lift the rusty bolts)
Grabbing these tools first will help you get the job done quickly and easily. following this step-by-step guide to make the task of removing toilet seat fasteners an easy game.
Removing and replacing the Toilet Seat (Hidden Fixings And Bolts)
Before getting started with the removal process you have to know what type of fastening mechanism the seats are attached to. Also, this can be done while examining the hinge fixing caps behind the seats.
Step 1:
To start with the process to remove the toilet set with hidden fixings and bolts remember to wear protective gloves. Moreover, the most important thing is a clean toilet to help you maintain safety. So, for this purpose, you can clean your toilet and disinfect it before working.
Also, the gloves are not the hard and fast rule but, this will also help you work either way to the process.
Step 2:
After the protection layer, the second step to follow is to attach your toilet seat with the cover. This can be done by using duct tape. However, this act will help you work stress-free as it will help in resisting the seat falling continuously while working. This is the most important step. Also, If you are out of duct tape any partner, or help we can be asked for help.
Step 3:
So, as done with the safety measure; examine the way and the type of the cap covering the bolts and hinges. Once you have examined, use the necessary tool to drive them out. A mentioned above, some of the seats are easy and straightforward to open and only required a flat head screwdriver to work with. however, some of them may ask for complicated tools like wrench drivers or so.
For the best and time-saving results first, examine the type and use the right tool to help you get quick results. Moreover, do not forget to apply the required pressure in case of causing any damage to the toilet.
Step 4:

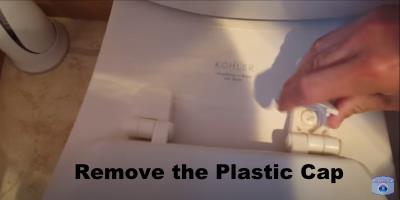
After that, to remove the plastic cap; just apply a little pressure beneath the caps with the flat head screwdriver to pop them out. this will help to unleash the hidden hinge mechanism of the seat. However, some of the caps are so easy to pop out but some of them may joint with the seat itself.
Step 5:

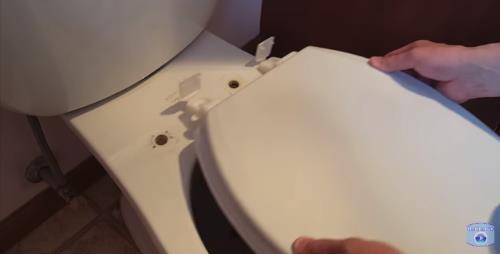
Now, the above steps have made it easy to separate the seat from the bowl. reattaching the seat from the bowl makes you examine the hinge mechanism more easily. Moreover, some toilet seats come with an easy-to-remove hinge mechanism. While some cases may need to study more.
Step 6:

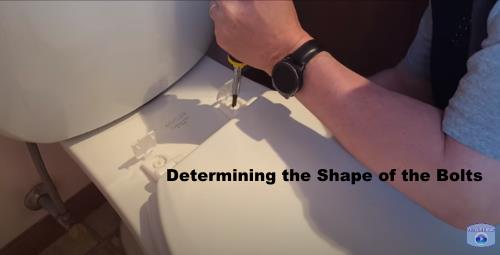
Once followed above steps, the hinge mechanism will allow determining the shape of the bolts. Usually, there are two types of bolts that have been seen with the toilet seat. Slot one and Philip’s head. The look at the bolts will help you get the right tool. However, the slot-shaped bolt can be uplift with the help of a flat head screwdriver. Whereas, the Philip bolt may require a Philip head or star head.
Unscrew the screws while applying adjustable pressure. However, the heavy pressure may make your task more challenging and time taking by damaging the head of the screw.
Step 7:
If the toilet is old and used metal bolts that are rusted, you can use any penetrating oil like WD40 or you can use cooking oil as a DIY. Moreover, if the screws of your toilet are attached to the wingnut, use your hand to hold them from rotating with the screw. Moreover, a wrench or a pair of pliers can be used to secure them.
Step 8:

The removal of the toilet seat with the hidden fixings and bolts is done successfully.
Once done with the removal of the hinge mechanism, cleaning the toilet is easier than you expected. Moreover, this will help you to thoroughly clean the dirt and disinfect the narrow areas which often left while cleaning making it a safety risk.
Install new hinges and bolts
Once the toilet seat is removed, check the condition of the hinges. You may need to replace the hinges and bolts if they are damaged. Also, you can choose to replace the loose toilet seat entirely.
Conclusion:
Bringing it to the end, the above-given steps can be followed carefully to remove the toilet seat with hidden fixing and bolts. This guide may help to make your next removal easier and rust-free. Also, by removing the seat the cleaning and disinfecting of the toilet area has been made easy.
Source Image: https://www.youtube.com/watch?v=lI4hIoQsf3U
Related Helpful Guides:

